


以下是安装过程,下载地址就不说了
[root@registry opt]# tar -xzf teleport-server-linux-x64-2.2.10.1.tar.gz
[root@registry opt]# cd teleport-server-linux-x64-2.2.10.1/
[root@registry teleport-server-linux-x64-2.2.10.1]# ./setup.sh
[]===========================================================================[]
| Teleport Server Installation |
|===========================================================================|
| ver: 2.2.10.1 |
| author: apexliu@eomsoft.net |
[]===========================================================================[]
Welcome to install Teleport Server!
NOTICE: There are a few steps need you enter information or make choice,
if you want to use the default settings, just press `Enter` key.
Otherwise you need enter the highlight character to make choice.
Prepare installation...
- check local installation ... [not exists]
Set installation path [/usr/local/teleport]: //这里输入安装位置默认回车安装在/usr/local/teleport
- copy [/opt/teleport-server-linux-x64-2.2.10.1/data/bin]
-> [/usr/local/teleport/bin]
- copy [/opt/teleport-server-linux-x64-2.2.10.1/data/www]
-> [/usr/local/teleport/www]
- copy [/opt/teleport-server-linux-x64-2.2.10.1/data/tmp/etc]
-> [/usr/local/teleport/data/etc]
process [daemon.in] to [/etc/init.d/teleport]
process [start.sh.in] to [/usr/local/teleport/start.sh]
process [stop.sh.in] to [/usr/local/teleport/stop.sh]
process [status.sh.in] to [/usr/local/teleport/status.sh]
start services...
starting teleport core server ... [done]
starting teleport web ... [done]
check services status...
teleport core server is running.
teleport web server is running.
--==[ ALL DONE ]==--
Installation done.
[root@registry teleport-server-linux-x64-2.2.10.1]#
开通防火墙:
[root@registry etc]# firewall-cmd --permanent --add-port=7190/tcp 页面端口
[root@registry etc]# firewall-cmd --permanent --add-port=52189/tcp SSH代理端口
[root@registry etc]# firewall-cmd --permanent --add-port=52189/tcp 远程桌面代理端口
[root@registry etc]# firewall-cmd --permanent --add-port=52189/tcp Telnet代理端口
访问
默认账号和密码为admin
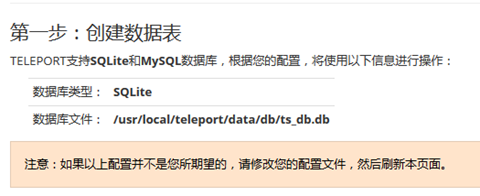
第一步配置数据库,默认使用的是SQLite,如果只是测试和几台机器的堡垒,完全可以用,
如果需要使用mysql,需要修改配置文件
=====
修改数据库为mysql,需要提前安装mysql,准备相关数据库
1、安装数据库,我使用的7.1,所以使用mariadb
[root@registry etc]# yum install mariadb-server mariadb-devel mariadb-libs
2、开机启动服务
[root@registry etc]# systemctl enable mariadb.service
3、启动服务
[root@registry etc]# systemctl start mariadb.service
4、初始配置
[root@registry etc]# mysql_secure_installation
/usr/bin/mysql_secure_installation: line 379: find_mysql_client: command not found
NOTE: RUNNING ALL PARTS OF THIS SCRIPT IS RECOMMENDED FOR ALL MariaDB
SERVERS IN PRODUCTION USE! PLEASE READ EACH STEP CAREFULLY!
In order to log into MariaDB to secure it, we'll need the current
password for the root user. If you've just installed MariaDB, and
you haven't set the root password yet, the password will be blank,
so you should just press enter here.
Enter current password for root (enter for none): //安装完成为后默认无密码,直接回车
OK, successfully used password, moving on...
Setting the root password ensures that nobody can log into the MariaDB
root user without the proper authorisation.
Set root password? [Y/n] y //设置新的密码
New password:
Re-enter new password:
Password updated successfully!
Reloading privilege tables..
... Success!
By default, a MariaDB installation has an anonymous user, allowing anyone
to log into MariaDB without having to have a user account created for
them. This is intended only for testing, and to make the installation
go a bit smoother. You should remove them before moving into a
production environment.
Remove anonymous users? [Y/n] y //移除匿名用户
... Success!
Normally, root should only be allowed to connect from 'localhost'. This
ensures that someone cannot guess at the root password from the network.
Disallow root login remotely? [Y/n] n //禁用root远程登陆,这里我不禁用
... skipping.
By default, MariaDB comes with a database named 'test' that anyone can
access. This is also intended only for testing, and should be removed
before moving into a production environment.
Remove test database and access to it? [Y/n] y //删除测试数据库
- Dropping test database...
... Success!
- Removing privileges on test database...
... Success!
Reloading the privilege tables will ensure that all changes made so far
will take effect immediately.
Reload privilege tables now? [Y/n] y //立即刷新权限列表
... Success!
Cleaning up...
All done! If you've completed all of the above steps, your MariaDB
installation should now be secure.
Thanks for using MariaDB!
[root@registry etc]# mysql -u root -p //进入数据库
Enter password:
Welcome to the MariaDB monitor. Commands end with ; or \g.
Your MariaDB connection id is 11
Server version: 5.5.41-MariaDB MariaDB Server
Copyright (c) 2000, 2014, Oracle, MariaDB Corporation Ab and others.
Type 'help;' or '\h' for help. Type '\c' to clear the current input statement.
MariaDB [(none)]> create database teleport; //创建数据库
Query OK, 1 row affected (0.00 sec)
MariaDB [(none)]>
==========
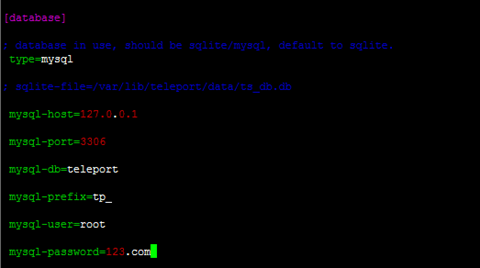
[root@registry etc]# cd /usr/local/teleport/data/etc
[root@registry etc]# vim web.ini
修改相关设定,数据库也需要提前创建,当然不建议用root用户来管理的。
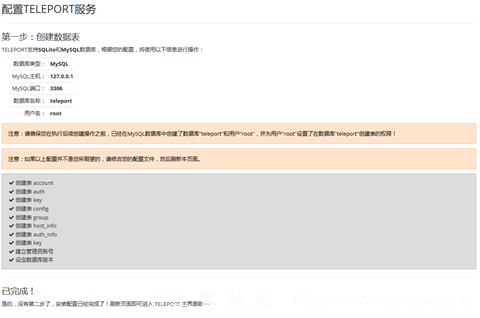
再次刷新页面发现为mysql相关,点击创建,即可完成
安装teleport助手,这个是安装在客户机上的,操作主机上的
使用操作不具体说明,在配置中添加相关的主机信息,直接使用
文章末尾固定信息
评论