一、环境准备
1、监控机环境信息
System | Centos 7 桌面安装 |
Disk | 40GB (建议40GB以上) |
IP Addr | 192.168.150.7 |
Hostname | Nagios-Mon |
Yum | 本地 |
Nagios | nagios-4.3.4 下载地址:https://www.nagios.org/downloads/nagios-core/ |
Plugin | nagios-plugins-2.2.1 下载地址:https://www.nagios.org/downloads/nagios-plugins/ |
App path | /usr/local/nagios |
WEB Auth | nagiosadmin:123.com |
System User | root |
Password | 123.com |
2、Linxu 监控端
System | Centos 7 桌面安装 |
IP Addr | 192.168.150.8 |
Hostname | Nagios-Linux-Agent |
Yum | 本地 |
Plugin | nagios-plugins-2.2.1 下载地址:https://www.nagios.org/downloads/nagios-plugins/ |
NRPE | 3.2.1 下载地址:https://github.com/NagiosEnterprises/nrpe |
System User | root |
Password | 123.com |
3、Windos监控端
System | Windos server 2012 R2 GUI |
IP Addr | 192.168.150.9 |
Hostname | Nagios-Win-Agent |
NSClient++ | NSCP-0.5.1.44 下载地址 |
System User | Administrator |
Password | 123.com |
二、基本环境配置
1、上传软件到/opt目录,该目录不是特定,根据爱好存放

2、修改主机名
[root@localhost opt]#hostnamectl set-hostname Nagios-Mon
3、配置本地YUM源
[root@localhost opt]#yum-config-manager --add-repo="file:///media/Packages"
4、导入公钥信息,使RPM包可信
[root@localhost opt]#rpm --import /media/RPM-GPG-KEY-CentOS-*
5、安装基本组件
[root@localhost opt]#yum install gcc httpd php gd openssl openssl-devel glibc glibc-common make net-snmp
6、添加nagios用户
[root@localhost opt]#useradd nagios //创建用户
[root@localhost opt]#echo "123.com" | passwd nagios --stdin //设置用户密码,不是非必须
[root@localhost opt]#usermod -G nagios apache //把Nagios添加到Apache组,CGI执行
三、安装Nagios
1、解压nagios源码文件
[root@localhost opt]#cd /opt/
[root@localhost opt]#tar -xzf nagios-4.3.4.tar.gz
[root@localhost opt]#cd nagios-4.3.4/
2、编译nagios源码文件
[root@localhost nagios-4.3.4]#./configure
[root@localhost nagios-4.3.4]#make all
3、安装相关功能组件
[root@localhost nagios-4.3.4]#make install && make install-init && make install-commandmode && make install-config && make install-webconf&&make install-exfoliation&&make install-classicui
4、启动和注册相关服务、
[root@localhost nagios-4.3.4]# systemctl enable nagios
//注册开机启动服务
[root@localhost nagios-4.3.4]# systemctl start nagios
//启动服务
[root@localhost nagios-4.3.4]# systemctl status nagios
//查看服务状态
[root@localhost nagios-4.3.4]# systemctl enable httpd
[root@localhost nagios-4.3.4]# systemctl start httpd
[root@localhost nagios-4.3.4]# systemctl status httpd
5、防火墙允许访问页面
[root@localhost nagios-4.3.4]# firewall-cmd --add-service=http --permanent
//添加持久化策略
[root@localhost nagios-4.3.4]# firewall-cmd --reload
//重新加载防火墙策略
6、创建WEB页面访问用户
[root@localhost eventhandlers]# htpasswd -c /usr/local/nagios/etc/htpasswd.users nagiosadmin
New password:
Re-type new password:
Adding password for user nagiosadmin
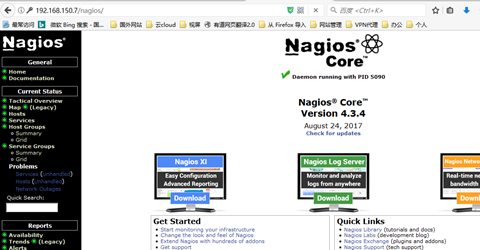
7、验证Nagios访问
四、认识NRPE工作流程
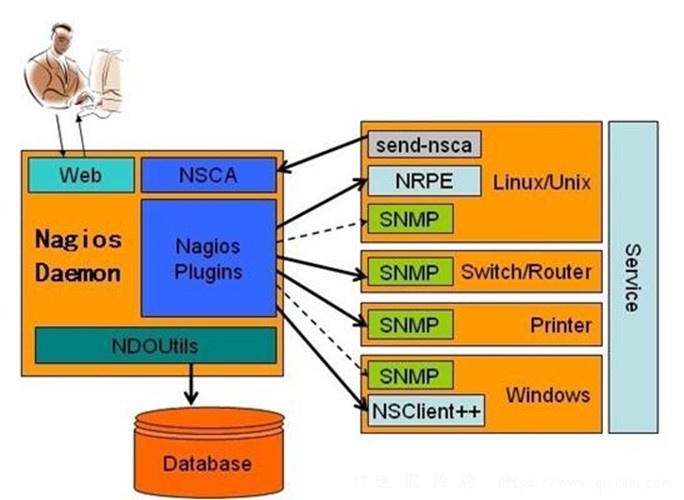
1、Nagios 常规部署架构,NSCA、NDOUtils 不是必须组件
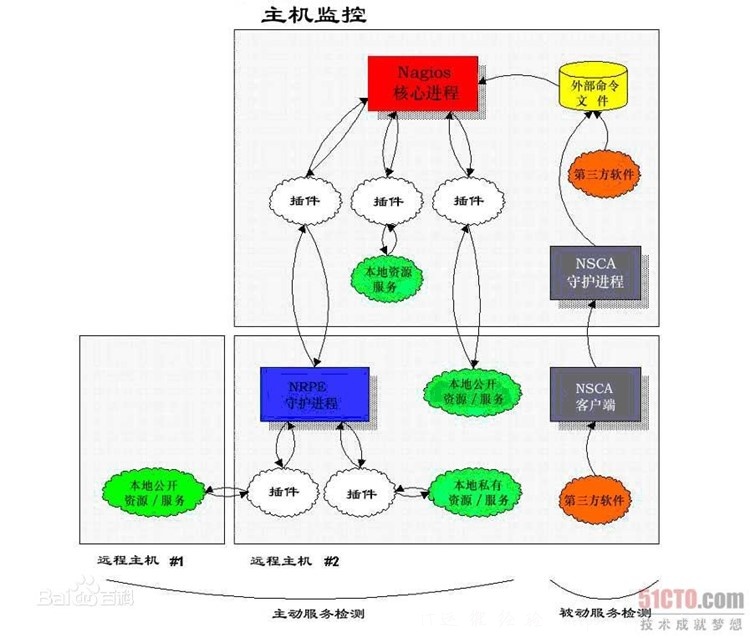
2、nagios监控模式工作流程说明
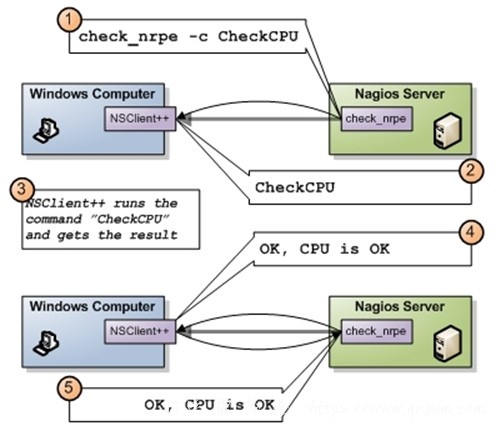
3、NRPE 工作说明

4、NSClient++ windos客户端说明
五、安装Nagios-plugin(在监控机或者Linux Agent上都安装,不是非必须)
[root@localhost opt]# tar -xzf nagios-plugins-2.2.1.tar.gz
[root@localhost nagios-plugins-2.2.1]# ./configure && make && make install //编译安装
[root@localhost nagios-plugins-2.2.1]# cd /usr/local/nagios/libexec/
//验证
[root@localhost libexec]# ls
六、准备第一个Linux Agaent主机
1、安装GCC 编译环境,配置yum源,上传安装文件,查看nagios操作步骤
[root@localhost opt]# yum install gcc openssl openssl-devel
2、在Linux Agaent主机上安装nagios-plugin (参考第五步)
3、创建一个Nagios用户,用于运行NRPE守护进程,并添加服务端口
[root@localhost nrpe-3.2.1]# useradd nagios
[root@localhost nrpe-3.2.1]# vi /etc/services
nrpe 5666/tcp # Nagios Montor Agent
4、安装NRPE
[root@localhost opt]# tar -xzf nrpe-3.2.1.tar.gz
[root@localhost opt]# cd nrpe-3.2.1/
[root@localhost nrpe-3.2.1]# ./configure
[root@localhost nrpe-3.2.1]# make all
[root@localhost nrpe-3.2.1]# make install-daemon
[root@localhost nrpe-3.2.1]# make install-config
[root@localhost nrpe-3.2.1]# make install-init
[root@localhost nrpe-3.2.1]# make install-plugin
[root@localhost nrpe-3.2.1]# systemctl enable nrpe
[root@localhost nrpe-3.2.1]# systemctl start nrpe.service
[root@localhost nrpe-3.2.1]# systemctl status nrpe.service
5、修改配置文件,允许Nagios访问
[root@localhost nrpe-3.2.1]# cd /usr/local/nagios/etc/
[root@localhost etc]# vi nrpe.cfg
allowed_hosts=127.0.0.1,::1,192.168.150.7
[root@localhost etc]# systemctl restart nrpe.service
[root@localhost etc]# /usr/local/nagios/libexec/check_nrpe -H 127.0.0.1
6、开通防火墙允许Nagios进行访问
[root@localhost etc]# firewall-cmd --permanent --add-rich-rule 'rule family=ipv4 source address=192.168.150.7 port port=5666 protocol=tcp accept'
[root@localhost etc]# firewall-cmd --reload
7、在Nagios 主机上进行访问测试
[root@localhost libexec]# ./check_nrpe -H 192.168.150.8
注:如果监控主机上没有check_nrpe插件,可以通过Agent拷贝一个
[root@localhost etc]# scp ../libexec/check_nrpe 192.168.150.7:/usr/local/nagios/libexec/
8、通过命令测试第一个检查项目
[root@localhost libexec]# ./check_nrpe -H 192.168.150.8 -c check_users
[root@localhost libexec]# ./check_nrpe -H 192.168.150.8 -c check_load
[root@nagios-mon libexec]# ./check_ping -H 192.168.150.8 -w 10,80% -c 10,90%
七、配置监控第一个Linux主机,以下文件都在linux.cfg中配置
[root@localhost objects]# cd /usr/local/nagios/etc/objects
[root@localhost objects]# vim linux.cfg
1、定义我们要检测的动作,我们需要做的一些事情
define command{
command_name Linux_check_user
command_line /usr/local/nagios/libexec/check_nrpe -H 192.168.150.8 -c check_users
}
define command{
command_name Linux_check_load
command_line /usr/local/nagios/libexec/check_nrpe -H 192.168.150.8 -c check_load
}
define command{
command_name Linux_Active
command_line /usr/local/nagios/libexec/check_ping -H 192.168.150.8 -w 10,80% -c 10,90%
}
define command{
command_name Send_Message
command_line /usr/bin/echo "This is Message" > /tmp/nagios.txt
}
2、定义时间,我们在什么时间来做这些事情
define timeperiod{
timeperiod_name worktime
alias necworkTime
sunday 00:00-24:00
monday 00:00-24:00
tuesday 00:00-24:00
wednesday 00:00-24:00
thursday 00:00-24:00
friday 00:00-24:00
saturday 00:00-24:00
}
3、定义联系人,服务器故障联系人
define contact{
contact_name Engineer
service_notification_period worktime
host_notification_period worktime
service_notification_commands Send_Message
host_notification_commands Send_Message
register 1
}
4、定义主机Host
define host{
host_name Nagios_Agaent
address 192.168.150.8
register 1
check_command Linux_Active
check_interval 5
check_period worktime
max_check_attempts 4
contacts Engineer
notification_period worktime
}
5、定义服务
define service{
host_name Nagios_Agaent
service_description UserAccess
check_command Linux_check_user
register 1
check_period worktime
max_check_attempts 3
check_interval 10
retry_interval 1
notification_interval 60
contacts Engineer
notification_period worktime
}
define service{
host_name Nagios_Agaent
service_description CPU_Load
check_command Linux_check_load
register 1
check_period worktime
max_check_attempts 3
check_interval 10
retry_interval 1
notification_interval 60
contacts Engineer
notification_period worktime
}
6、修改Nagios主配置文件,加载新创建的配置文件
[root@localhost objects]# cd /usr/local/nagios/etc/
[root@localhost etc]# vim nagios.cfg
cfg_file=/usr/local/nagios/etc/objects/linux.cfg
7、验证配置是否正确
[root@localhost etc]# /usr/local/nagios/bin/nagios -v /usr/local/nagios/etc/nagios.cfg
Total Warnings: 0
Total Errors: 0
8、重新加载配置文件
[root@localhost etc]# systemctl reload nagios
八、优化监控配置
1、定义参数形式命令文件
[root@localhost objects]# cd /usr/local/nagios/etc/objects
define command{
command_name check_nrpe
command_line $USER1$/check_nrpe -H $HOSTADDRESS$ -c $ARG1$
}
2、创建一个新的主机监控配置文件
[root@localhost objects]# vim 1.cfg
;定义一个主机
define host{
use linux-server
host_name MyFirstLinux
alias MyFirstLinux
address 192.168.150.8
}
;定义主机上的监控服务
define service{
use local-service
host_name MyFirstLinux
service_description checkUser
check_command check_nrpe!check_users
}
define service{
use local-service
host_name MyFirstLinux
service_description checkLoad
check_command check_nrpe!check_load
}
3、修改Nagios主配置文件,加载新创建的配置文件
[root@localhost objects]# cd /usr/local/nagios/etc/
[root@localhost etc]# vim nagios.cfg
cfg_file=/usr/local/nagios/etc/objects/1.cfg
3、验证配置是否正确
[root@localhost etc]# /usr/local/nagios/bin/nagios -v /usr/local/nagios/etc/nagios.cfg
Total Warnings: 0
Total Errors: 0
5、重新加载配置文件
[root@localhost etc]# systemctl reload nagios
6、通过页面验证配置

八、准备安装Windos 监控端
1、安装nscp软件
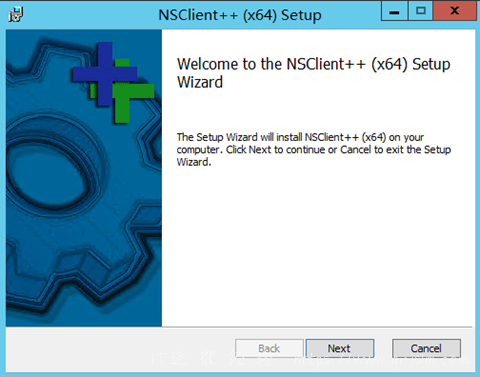
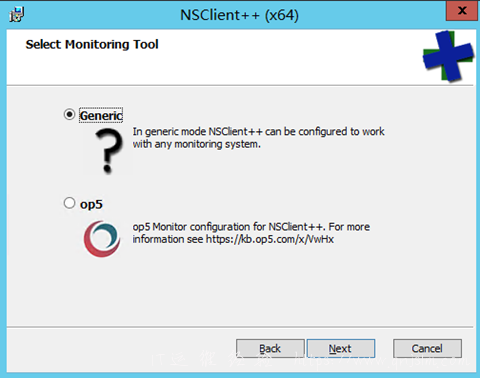
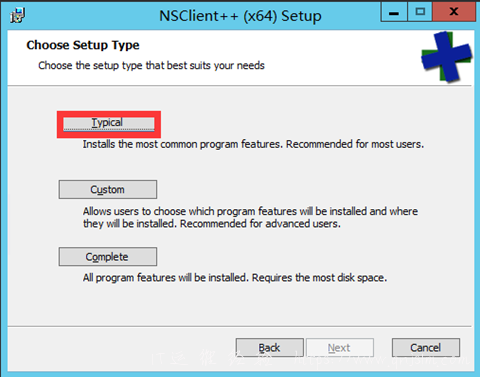
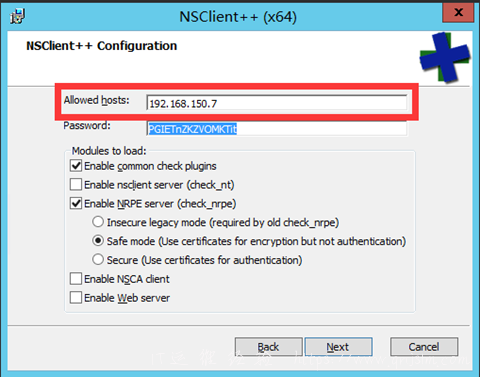
这里需要主机IP地址为Nagios的地址,和NRPE一样是需要运行访问的IP
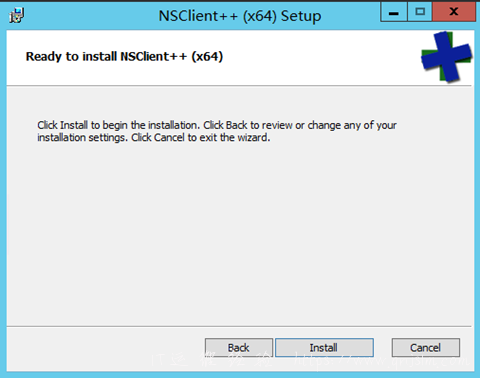

2、由于我们没有自己的CA服务器,修改配置文件,运行使用不安全的连接
修改文件 C:\Program Files\NSClient++\nsclient.ini
[/settings/NRPE/server]
insecure = True
verify mode = none
;以下是启用系统监控
[/modules]
CheckSystem = enabled
修改完成后重新相关服务
C:\Users\Administrator>net stop nscp && net start nscp
3、在nagios服务器上进行验证访问
[root@localhost libexec]# cd /usr/local/nagios/libexec/
[root@localhost libexec]# ./check_nrpe -H 192.168.150.9
如果看到客户端版本,安装正常。
4、配置一个windos监控服务
1、首现验证需要访问的服务
[root@localhost libexec]# ./check_nrpe -H 192.168.150.9 -c check_cpu
2、创建主机监控配置文件
[root@localhost libexec]# cd /usr/local/nagios/etc/objects/
[root@localhost objects]# vi 2.cfg
define host{
use linux-server
host_name server-windows
alias Windows
address 192.168.150.9
}
define service{
use local-service
host_name server-windows
service_description load
check_command check_nrpe!check_cpu
}
3、在nagios组配置文件加载这台主机的配置文件
[root@localhost objects]# cd ../
[root@localhost etc]# vim nagios.cfg
cfg_file=/usr/local/nagios/etc/objects/2.cfg
4、验证配置是否正确
[root@localhost etc]# /usr/local/nagios//bin/nagios -v nagios.cfg
5、让nagios重新加载配置文件
[root@localhost etc]# systemctl reload nagios
6、WEB Server验证
九、在Linux上使用自定义监控简本
1、编写一个Linux检测项目脚本
[root@localhost opt]# vim process.sh
#!/bin/sh
pronum=`/usr/bin/ps -ef | wc | awk '{print $1}'`
echo "OK-this server Totle process is :" $pronum
exit 1
2、设置权限,运行nrpe用户执行
[root@localhost opt]# chown nagios:nagios process.sh
3、修改nrpe插件添加扩展外部命令
[root@localhost opt]# vim /usr/local/nagios/etc/nrpe.cfg
command[check_procs]=/usr/bin/bash /opt/process.sh
4、重启Agaent的Nrpe服务,读取新的配置文件
[root@localhost opt]# systemctl reload nrpe
5、在Nagios服务器上进行验证
[root@localhost libexec]# ./check_nrpe -H 192.168.150.8 -c check_procs
6、添加到配置文件1.cfg中,并让nagios重新读取配置文件
[root@localhost objects]# vim 1.cfg
define service{
use local-service
host_name MyFirstLinux
service_description processs
check_command check_nrpe!check_procs
}
[root@localhost objects]# systemctl reload nagios
7、WEB登陆验证

小实验
修改脚本中exit 后面的数字为0,2,3,4,会是什么效果了?
结果:
插件返回值
0 OK
1 WARNING
2 CRITICAL
3 UNKNOWN
4 PEENING 该状态nagios独自占有,插件退出值不为0、1、2、3 ,其他所有值都是状态3
十、Windos上使用自定义脚本
1、简单编写一个脚本
$process=Get-Process | Measure-Object
'This server Totle Process is {0}' -f $process.Count
exit 0
2、客户端启用扩展检测、以及添加自定义监控命令,修改配置文件nsclient.ini
[/modules]
CheckExternalScripts = enabled
[/settings/external scripts/wrappings]
ps1 = cmd /c echo scripts\\%SCRIPT% %ARGS%; exit($lastexitcode) | powershell.exe -command -
[/settings/external scripts/wrapped scripts]
check_procs= check_process.ps1
3、重启NSCP客户端软件
C:\Users\Administrator>net stop nscp && net start nscp
4、在nagios服务器上进行验证
[root@localhost libexec]# ./check_nrpe -H 192.168.150.9 -c check_procs
5、添加到配置文件2.cfg中
[root@localhost libexec]# vi /usr/local/nagios/etc/objects/2.cfg
define service{
use local-service
host_name server-windows
service_description process
check_command check_nrpe!check_procs
}
剩下步骤不在说明,重新读取配置文件
文章末尾固定信息




评论